This is the multi-page printable view of this section. .
Operations guide
- 1: Authentication Guides
- 1.1: Authentication
- 1.2: Role-based access control
- 2: Configuration options
- 3: Transport security model
- 4: Clustering Guide
- 5: Run etcd clusters as a Kubernetes StatefulSet
- 6: Run etcd clusters inside containers
- 7: Failure modes
- 8: Disaster recovery
- 9: etcd gateway
- 10: gRPC proxy
- 11: Hardware recommendations
- 12: Maintenance
- 13: Monitoring etcd
- 14: Performance
- 15: Design of runtime reconfiguration
- 16: Runtime reconfiguration
- 17: Supported platforms
- 18: Versioning
- 19: Data Corruption
1 - Authentication Guides
1.1 - Authentication
auth,user,role for authentication:
Note:
This is just a stub which needs to be filled and updated with more information on authentication. The text above is just a code example.
1.2 - Role-based access control
Overview
Authentication was added in etcd 2.1. The etcd v3 API slightly modified the authentication feature’s API and user interface to better fit the new data model. This guide is intended to help users set up basic authentication and role-based access control in etcd v3.
Special users and roles
There is one special user, root, and one special role, root.
User root
The root user, which has full access to etcd, must be created before activating authentication. The idea behind the root user is for administrative purposes: managing roles and ordinary users. The root user must have the root role and is allowed to change anything inside etcd.
Role root
The role root may be granted to any user, in addition to the root user. A user with the root role has both global read-write access and permission to update the cluster’s authentication configuration. Furthermore, the root role grants privileges for general cluster maintenance, including modifying cluster membership, defragmenting the store, and taking snapshots.
Working with users
The user subcommand for etcdctl handles all things having to do with user accounts.
A listing of users can be found with:
Creating a user is as easy as
Creating a new user will prompt for a new password. The password can be supplied from standard input when an option --interactive=false is given. --new-user-password can also be used for supplying the password.
Creating a user which cannot be authenticated with password is also possible like below:
Such a user can only be authenticated with TLS Common Name .
etcd does not support authentication with an empty password via --user username:. For example, a user created with an empty password, such as etcdctl user add anonymous:'', cannot authenticate through username/password requests and requests such as etcdctl --user anonymous: get foo fail with user name is empty.
Roles can be granted and revoked for a user with:
The user’s settings can be inspected with:
And the password for a user can be changed with
Changing the password will prompt again for a new password. The password can be supplied from standard input when an option --interactive=false is given.
Delete an account with:
Working with roles
The role subcommand for etcdctl handles all things having to do with access controls for particular roles, as were granted to individual users.
List roles with:
Create a new role with:
A role has no password; it merely defines a new set of access rights.
Roles are granted access to a single key or a range of keys.
The range can be specified as an interval [start-key, end-key) where start-key should be lexically less than end-key in an alphabetical manner.
Access can be granted as either read, write, or both, as in the following examples:
To see what’s granted, we can look at the role at any time:
Revocation of permissions is done the same logical way:
As is removing a role entirely:
Enabling authentication
The minimal steps to enabling auth are as follows. The administrator can set up users and roles before or after enabling authentication, as a matter of preference.
Make sure the root user is created:
Enable authentication:
After this, etcd is running with authentication enabled. To disable it for any reason, use the reciprocal command:
Security Scope of Authentication
When authentication is enabled with etcdctl auth enable, it protects the V3 gRPC API operations (get, put, delete, watch, etc.).
The /metrics and /health HTTP endpoints operate on a separate handler and are not protected by V3 RBAC authentication. This design allows Prometheus and load balancers to scrape metrics without requiring gRPC authentication, while still protecting the key-value data.
To secure these observability endpoints:
- Enable mTLS with
--cert-file,--key-file, and--client-cert-auth - Or bind metrics to a private interface using
--listen-metrics-urls - Or use network policies/firewall rules to restrict access
Using etcdctl to authenticate
etcdctl supports a similar flag as curl for authentication.
The password can be taken from a prompt:
The password can also be taken from a command line flag --password:
Otherwise, all etcdctl commands remain the same. Users and roles can still be created and modified, but require authentication by a user with the root role.
Using TLS Common Name
As of version v3.2 if an etcd server is launched with the option --client-cert-auth=true, the field of Common Name (CN) in the client’s TLS cert will be used as an etcd user. In this case, the common name authenticates the user and the client does not need a password. Note that if both of 1. --client-cert-auth=true is passed and CN is provided by the client, and 2. username and password are provided by the client, the username and password based authentication is prioritized. Note that this feature cannot be used with gRPC-proxy and gRPC-gateway. This is because gRPC-proxy terminates TLS from its client so all the clients share a cert of the proxy. gRPC-gateway uses a TLS connection internally for transforming HTTP request to gRPC request so it shares the same limitation. Therefore the clients cannot provide their CN to the server correctly. gRPC-proxy will cause an error and stop if a given cert has non empty CN. gRPC-proxy returns an error which indicates that the client has an non empty CN in its cert.
Notes on password strength
The etcdctl and etcd API do not enforce a specific password length during user creation or user password update operations. It is the responsibility of the administrator to enforce these requirements. For avoiding security risks related to password strength, TLS Common Name based authentication
and users created with --no-password option can be utilized.
2 - Configuration options
You can configure etcd through the following:
- Command-line flags
- Environment variables: every flag has a corresponding environment variable
that has the same name but is prefixed with
ETCD_and formatted in all caps and snake case . For example,--some-flagwould beETCD_SOME_FLAG. - Configuration file
Caution: If you mix-and-match configuration options, then the following rules apply.
- Command-line flags take precedence over environment variables.
- If you provide a configuration file all command-line flags and environment variables are ignored.
Command-line flags
Flags are presented below using the format --flag-name DEFAULT_VALUE.
The list of flags provided below may not be up-to-date due to ongoing development changes. For the latest available flags, run etcd --help or refer to the etcd help
.
Note: For details concerning new, updated, and deprecated v3.7 flags, see CHANGELOG-3.7.md .
Member
Clustering
Security
Auth
Profiling and monitoring
Logging
Note: Several --experimental-* flags have been promoted or renamed in v3.7.
Be sure to replace deprecated flags with their stable counterparts listed below.
Distributed tracing
v2 Proxy
Note: flags will be deprecated in v3.6.
Features
Feature Gates
Unsafe features
Warning: using unsafe features may break the guarantees given by the consensus protocol!
Configuration file
An etcd configuration file consists of a YAML map whose keys are command-line
flag names and values are the flag values.
In order to use this file, specify the file path as a value to the --config-file flag or ETCD_CONFIG_FILE environment variable.
For an example, see the etcd.conf.yml sample .
Duration fields such as --grpc-keepalive-min-time, --grpc-keepalive-interval,
--grpc-keepalive-timeout, --backend-batch-interval, --corrupt-check-time,
--compact-hash-check-time, --compaction-sleep-interval,
--watch-progress-notify-interval, --warning-apply-duration,
--warning-unary-request-duration, and --downgrade-check-time accept
human-readable strings (e.g. 10m, 5s) when passed as command-line flags, but
in a configuration file they only accept integer values representing
nanoseconds. This is a known Go standard library limitation
where time.Duration is unmarshaled as a plain integer.
For example, to set a 10-minute watch progress notify interval in a config file:
3 - Transport security model
etcd supports automatic TLS as well as authentication through client certificates for both clients to server as well as peer (server to server / cluster) communication. Note that etcd doesn’t enable RBAC based authentication or the authentication feature in the transport layer by default to reduce friction for users getting started with the database. Further, changing this default would be a breaking change for the project which was established since 2013. An etcd cluster which doesn’t enable security features can expose its data to any clients.
To get up and running, first have a CA certificate and a signed key pair for one member. It is recommended to create and sign a new key pair for every member in a cluster.
For convenience, the cfssl tool provides an easy interface to certificate generation, and we provide an example using the tool here . Alternatively, try this guide to generating self-signed key pairs .
The list of flags provided below may not be up-to-date due to ongoing development changes. For the latest available flags, run etcd --help or refer to the etcd help
.
Basic setup
etcd takes several certificate related configuration options, either through command-line flags or environment variables:
Client-to-server communication:
--cert-file=<path>: Certificate used for SSL/TLS connections to etcd. When this option is set, advertise-client-urls can use the HTTPS schema.
--key-file=<path>: Key for the certificate. Must be unencrypted.
--client-cert-auth: When this is set etcd will check all incoming HTTPS requests for a client certificate signed by the trusted CA, requests that don’t supply a valid client certificate will fail. If authentication
is enabled, the certificate provides credentials for the user name given by the Common Name field.
--trusted-ca-file=<path>: Trusted certificate authority.
--auto-tls: Use automatically generated self-signed certificates for TLS connections with clients.
Peer (server-to-server / cluster) communication:
The peer options work the same way as the client-to-server options:
--peer-cert-file=<path>: Certificate used for SSL/TLS connections between peers. This will be used both for listening on the peer address as well as sending requests to other peers.
--peer-key-file=<path>: Key for the certificate. Must be unencrypted.
--peer-client-cert-auth: When set, etcd will check all incoming peer requests from the cluster for valid client certificates signed by the supplied CA.
--peer-trusted-ca-file=<path>: Trusted certificate authority.
--peer-auto-tls: Use automatically generated self-signed certificates for TLS connections between peers.
If either a client-to-server or peer certificate is supplied the key must also be set. All of these configuration options are also available through the environment variables, ETCD_CA_FILE, ETCD_PEER_CA_FILE and so on.
Common options:
--cipher-suites: Comma-separated list of supported TLS cipher suites between server/client and peers (empty will be auto-populated by Go).
--tls-min-version=<version> Sets the minimum TLS version supported by etcd.
--tls-max-version=<version> Sets the maximum TLS version supported by etcd. If not set the maximum version supported by Go will be used.
TLS certificate keyUsage and extendedKeyUsage
When generating X.509 certificates for securing etcd transport,
certificates should include appropriate keyUsage and
extendedKeyUsage fields depending on their role. etcd relies on Go’s
crypto/tls and crypto/x509 libraries for certificate verification,
which enforce these usages during the TLS handshake.
The following table summarizes the recommended usages for common certificate roles:
| Certificate role | keyUsage | extendedKeyUsage |
|---|---|---|
| Server (client-to-server) | digitalSignature, keyEncipherment | serverAuth |
| Client | digitalSignature, keyEncipherment | clientAuth |
| Peer (server-to-server) | digitalSignature, keyEncipherment | serverAuth, clientAuth |
Notes:
- When
--peer-client-cert-authis enabled, peer certificates are used for mutual TLS between etcd members and therefore require bothserverAuthandclientAuth. - Client certificates used with
--client-cert-authshould includeclientAuth.
Example 1: Client-to-server transport security with HTTPS
For this, have a CA certificate (ca.crt) and signed key pair (server.crt, server.key) ready.
Let us configure etcd to provide simple HTTPS transport security step by step:
This should start up fine and it will be possible to test the configuration by speaking HTTPS to etcd:
The command should show that the handshake succeed. Since we use self-signed certificates with our own certificate authority, the CA must be passed to curl using the --cacert option. Another possibility would be to add the CA certificate to the system’s trusted certificates directory (usually in /etc/pki/tls/certs or /etc/ssl/certs).
OSX 10.9+ Users: curl 7.30.0 on OSX 10.9+ doesn’t understand certificates passed in on the command line.
Instead, import the dummy ca.crt directly into the keychain or add the -k flag to curl to ignore errors.
To test without the -k flag, run open ./tests/fixtures/ca/ca.crt and follow the prompts.
Please remove this certificate after testing!
If there is a workaround, let us know.
Example 2: Client-to-server authentication with HTTPS client certificates
For now we’ve given the etcd client the ability to verify the server identity and provide transport security. We can however also use client certificates to prevent unauthorized access to etcd.
The clients will provide their certificates to the server and the server will check whether the cert is signed by the supplied CA and decide whether to serve the request.
The same files mentioned in the first example are needed for this, as well as a key pair for the client (client.crt, client.key) signed by the same certificate authority.
Now try the same request as above to this server:
The request should be rejected by the server:
To make it succeed, we need to give the CA signed client certificate to the server:
The output should include:
And also the response from the server:
Specify cipher suites to block weak TLS cipher suites .
TLS handshake would fail when client hello is requested with invalid cipher suites.
For instance:
Then, client requests must specify one of the cipher suites specified in the server:
Example 3: Transport security & client certificates in a cluster
etcd supports the same model as above for peer communication, that means the communication between etcd members in a cluster.
Assuming we have our ca.crt and two members with their own key pairs (member1.crt & member1.key, member2.crt & member2.key) signed by this CA, we launch etcd as follows:
The etcd members will form a cluster and all communication between members in the cluster will be encrypted and authenticated using the client certificates. The output of etcd will show that the addresses it connects to use HTTPS.
Example 4: Automatic self-signed transport security
When you specify ClientAutoTLS and PeerAutoTLS, the validity period of the client certificate and peer certificate automatically generated by etcd is only 1 year. You can specify the –self-signed-cert-validity flag to set the validity period of the certificate in years.
For cases where communication encryption, but not authentication, is needed, etcd supports encrypting its messages with automatically generated self-signed certificates. This simplifies deployment because there is no need for managing certificates and keys outside of etcd.
Configure etcd to use self-signed certificates for client and peer connections with the flags --auto-tls and --peer-auto-tls:
Self-signed certificates do not authenticate identity so curl will return an error:
To disable certificate chain checking, invoke curl with the -k flag:
Notes for DNS SRV
Since v3.1.0 (except v3.2.9), discovery SRV bootstrapping authenticates ServerName with a root domain name from --discovery-srv flag. This is to avoid man-in-the-middle cert attacks, by requiring a certificate to have matching root domain name in its Subject Alternative Name (SAN) field. For instance, etcd --discovery-srv=etcd.local will only authenticate peers/clients when the provided certs have root domain etcd.local as an entry in Subject Alternative Name (SAN) field
Notes for etcd proxy
etcd proxy terminates the TLS from its client if the connection is secure, and uses proxy’s own key/cert specified in --peer-key-file and --peer-cert-file to communicate with etcd members.
The proxy communicates with etcd members through both the --advertise-client-urls and --advertise-peer-urls of a given member. It forwards client requests to etcd members’ advertised client urls, and it syncs the initial cluster configuration through etcd members’ advertised peer urls.
When client authentication is enabled for an etcd member, the administrator must ensure that the peer certificate specified in the proxy’s --peer-cert-file option is valid for that authentication. The proxy’s peer certificate must also be valid for peer authentication if peer authentication is enabled.
Notes for TLS authentication
Since v3.2.0 , TLS certificates get reloaded on every client connection . This is useful when replacing expiry certs without stopping etcd servers; it can be done by overwriting old certs with new ones. Refreshing certs for every connection should not have too much overhead, but can be improved in the future, with caching layer. Example tests can be found here .
Since v3.2.0
, server denies incoming peer certs with wrong IP SAN
. For instance, if peer cert contains any IP addresses in Subject Alternative Name (SAN) field, server authenticates a peer only when the remote IP address matches one of those IP addresses. This is to prevent unauthorized endpoints from joining the cluster. For example, peer B’s CSR (with cfssl) is:
when peer B’s actual IP address is 10.138.0.2, not 10.138.0.27. When peer B tries to join the cluster, peer A will reject B with the error x509: certificate is valid for 10.138.0.27, not 10.138.0.2, because B’s remote IP address does not match the one in Subject Alternative Name (SAN) field.
Since v3.2.0
, server resolves TLS DNSNames when checking SAN
. For instance, if peer cert contains only DNS names (no IP addresses) in Subject Alternative Name (SAN) field, server authenticates a peer only when forward-lookups (dig b.com) on those DNS names have matching IP with the remote IP address. For example, peer B’s CSR (with cfssl) is:
when peer B’s remote IP address is 10.138.0.2. When peer B tries to join the cluster, peer A looks up the incoming host b.com to get the list of IP addresses (e.g. dig b.com). And rejects B if the list does not contain the IP 10.138.0.2, with the error tls: 10.138.0.2 does not match any of DNSNames ["b.com"].
Since v3.2.2
, server accepts connections if IP matches, without checking DNS entries
. For instance, if peer cert contains IP addresses and DNS names in Subject Alternative Name (SAN) field, and the remote IP address matches one of those IP addresses, server just accepts connection without further checking the DNS names. For example, peer B’s CSR (with cfssl) is:
when peer B’s remote IP address is 10.138.0.2 and invalid.domain is a invalid host. When peer B tries to join the cluster, peer A successfully authenticates B, since Subject Alternative Name (SAN) field has a valid matching IP address. See issue#8206
for more detail.
Since v3.2.5
, server supports reverse-lookup on wildcard DNS SAN
. For instance, if peer cert contains only DNS names (no IP addresses) in Subject Alternative Name (SAN) field, server first reverse-lookups the remote IP address to get a list of names mapping to that address (e.g. nslookup IPADDR). Then accepts the connection if those names have a matching name with peer cert’s DNS names (either by exact or wildcard match). If none is matched, server forward-lookups each DNS entry in peer cert (e.g. look up example.default.svc when the entry is *.example.default.svc), and accepts connection only when the host’s resolved addresses have the matching IP address with the peer’s remote IP address. For example, peer B’s CSR (with cfssl) is:
when peer B’s remote IP address is 10.138.0.2. When peer B tries to join the cluster, peer A reverse-lookup the IP 10.138.0.2 to get the list of host names. And either exact or wildcard match the host names with peer B’s cert DNS names in Subject Alternative Name (SAN) field. If none of reverse/forward lookups worked, it returns an error "tls: "10.138.0.2" does not match any of DNSNames ["*.example.default.svc","*.example.default.svc.cluster.local"]. See issue#8268
for more detail.
v3.3.0
adds etcd --peer-cert-allowed-cn
flag to support CN(Common Name)-based auth for inter-peer connections
. Kubernetes TLS bootstrapping involves generating dynamic certificates for etcd members and other system components (e.g. API server, kubelet, etc.). Maintaining different CAs for each component provides tighter access control to etcd cluster but often tedious. When –peer-cert-allowed-cn flag is specified, node can only join with matching common name even with shared CAs. The match is an exact string comparison against the certificate’s Common Name (CN) field — no wildcards or prefix matching is supported. For hostname-based filtering using –peer-cert-allowed-hostname or –client-cert-allowed-hostname, the match uses Go’s x509.Certificate.VerifyHostname(), which supports both exact hostnames and wildcard entries (e.g. *.example.com). For example, each member in 3-node cluster is set up with CSRs (with cfssl) as below:
Then only peers with matching common names will be authenticated if --peer-cert-allowed-cn etcd.local is given. And nodes with different CNs in CSRs or different --peer-cert-allowed-cn will be rejected:
Each process should be started with:
v3.2.19
and v3.3.4
fixes TLS reload when certificate SAN field only includes IP addresses but no domain names
. For example, a member is set up with CSRs (with cfssl) as below:
In Go, server calls (*tls.Config).GetCertificate for TLS reload if and only if server’s (*tls.Config).Certificates field is not empty, or (*tls.ClientHelloInfo).ServerName is not empty with a valid SNI from the client. Previously, etcd always populates (*tls.Config).Certificates on the initial client TLS handshake, as non-empty. Thus, client was always expected to supply a matching SNI in order to pass the TLS verification and to trigger (*tls.Config).GetCertificate to reload TLS assets.
However, a certificate whose SAN field does not include any domain names but only IP addresses
would request *tls.ClientHelloInfo with an empty ServerName field, thus failing to trigger the TLS reload on initial TLS handshake; this becomes a problem when expired certificates need to be replaced online.
Now, (*tls.Config).Certificates is created empty on initial TLS client handshake, first to trigger (*tls.Config).GetCertificate, and then to populate rest of the certificates on every new TLS connection, even when client SNI is empty (e.g. cert only includes IPs).
Notes for Host Whitelist
etcd --host-whitelist flag specifies acceptable hostnames from HTTP client requests. Client origin policy protects against “DNS Rebinding”
attacks to insecure etcd servers. That is, any website can simply create an authorized DNS name, and direct DNS to "localhost" (or any other address). Then, all HTTP endpoints of etcd server listening on "localhost" becomes accessible, thus vulnerable to DNS rebinding attacks. See CVE-2018-5702
for more detail.
Client origin policy works as follows:
- If client connection is secure via HTTPS, allow any hostnames.
- If client connection is not secure and
"HostWhitelist"is not empty, only allow HTTP requests whose Host field is listed in whitelist.
Note that the client origin policy is enforced whether authentication is enabled or not, for tighter controls.
By default, etcd --host-whitelist and embed.Config.HostWhitelist are set empty to allow all hostnames. Note that when specifying hostnames, loopback addresses are not added automatically. To allow loopback interfaces, add them to whitelist manually (e.g. "localhost", "127.0.0.1", etc.).
Frequently asked questions
I’m seeing a SSLv3 alert handshake failure when using TLS client authentication?
The crypto/tls package of golang checks the key usage of the certificate public key before using it.
To use the certificate public key to do client auth, we need to add clientAuth to Extended Key Usage when creating the certificate public key.
Here is how to do it:
Add the following section to openssl.cnf:
When creating the cert be sure to reference it in the -extensions flag:
With peer certificate authentication I receive “certificate is valid for 127.0.0.1, not $MY_IP”
Make sure to sign the certificates with a Subject Name the member’s public IP address. The etcd-ca tool for example provides an --ip= option for its new-cert command.
The certificate needs to be signed for the member’s FQDN in its Subject Name, use Subject Alternative Names (short IP SANs) to add the IP address. The etcd-ca tool provides --domain= option for its new-cert command, and openssl can make it
too.
Does etcd encrypt data stored on disk drives?
No. etcd doesn’t encrypt key/value data stored on disk drives. If a user need to encrypt data stored on etcd, there are some options:
- Let client applications encrypt and decrypt the data
- Use a feature of underlying storage systems for encrypting stored data like dm-crypt
I’m seeing a log warning that “directory X exist without recommended permission -rwx——”
When etcd create certain new directories it sets file permission to 700 to prevent unprivileged access as possible. However, if user has already created a directory with own preference, etcd uses the existing directory and logs a warning message if the permission is different than 700.
4 - Clustering Guide
Overview
Starting an etcd cluster statically requires that each member knows another in the cluster. In a number of cases, the IPs of the cluster members may be unknown ahead of time. In these cases, the etcd cluster can be bootstrapped with the help of a discovery service.
Once an etcd cluster is up and running, adding or removing members is done via runtime reconfiguration . To better understand the design behind runtime reconfiguration, we suggest reading the runtime configuration design document .
This guide will cover the following mechanisms for bootstrapping an etcd cluster:
Each of the bootstrapping mechanisms will be used to create a three machine etcd cluster with the following details:
| Name | Address | Hostname |
|---|---|---|
| infra0 | 10.0.1.10 | infra0.example.com |
| infra1 | 10.0.1.11 | infra1.example.com |
| infra2 | 10.0.1.12 | infra2.example.com |
Static
As we know the cluster members, their addresses and the size of the cluster before starting, we can use an offline bootstrap configuration by setting the initial-cluster flag. Each machine will get either the following environment variables or command line:
Note that the URLs specified in initial-cluster are the advertised peer URLs, i.e. they should match the value of initial-advertise-peer-urls on the respective nodes.
If spinning up multiple clusters (or creating and destroying a single cluster) with same configuration for testing purpose, it is highly recommended that each cluster is given a unique initial-cluster-token. By doing this, etcd can generate unique cluster IDs and member IDs for the clusters even if they otherwise have the exact same configuration. This can protect etcd from cross-cluster-interaction, which might corrupt the clusters.
etcd listens on listen-client-urls
to accept client traffic. etcd member advertises the URLs specified in advertise-client-urls
to other members, proxies, clients. Please make sure the advertise-client-urls are reachable from intended clients. A common mistake is setting advertise-client-urls to localhost or leave it as default if the remote clients should reach etcd.
On each machine, start etcd with these flags:
The command line parameters starting with --initial-cluster will be ignored on subsequent runs of etcd. Feel free to remove the environment variables or command line flags after the initial bootstrap process. If the configuration needs changes later (for example, adding or removing members to/from the cluster), see the runtime configuration
guide.
TLS
etcd supports encrypted communication through the TLS protocol. TLS channels can be used for encrypted internal cluster communication between peers as well as encrypted client traffic. This section provides examples for setting up a cluster with peer and client TLS. Additional information detailing etcd’s TLS support can be found in the security guide .
Self-signed certificates
A cluster using self-signed certificates both encrypts traffic and authenticates its connections. To start a cluster with self-signed certificates, each cluster member should have a unique key pair (member.crt, member.key) signed by a shared cluster CA certificate (ca.crt) for both peer connections and client connections. Certificates may be generated by following the etcd TLS setup
example.
On each machine, etcd would be started with these flags:
Automatic certificates
If the cluster needs encrypted communication but does not require authenticated connections, etcd can be configured to automatically generate its keys. On initialization, each member creates its own set of keys based on its advertised IP addresses and hosts.
On each machine, etcd would be started with these flags:
Error cases
In the following example, we have not included our new host in the list of enumerated nodes. If this is a new cluster, the node must be added to the list of initial cluster members.
In this example, we are attempting to map a node (infra0) on a different address (127.0.0.1:2380) than its enumerated address in the cluster list (10.0.1.10:2380). If this node is to listen on multiple addresses, all addresses must be reflected in the “initial-cluster” configuration directive.
If a peer is configured with a different set of configuration arguments and attempts to join this cluster, etcd will report a cluster ID mismatch will exit.
Discovery
In a number of cases, the IPs of the cluster peers may not be known ahead of time. This is common when utilizing cloud providers or when the network uses DHCP. In these cases, rather than specifying a static configuration, use an existing etcd cluster to bootstrap a new one. This process is called “discovery”.
There two methods that can be used for discovery:
- etcd discovery service
- DNS SRV records
etcd discovery
To better understand the design of the discovery service protocol, we suggest reading the discovery service protocol documentation .
Lifetime of a discovery URL
A discovery URL identifies a unique etcd cluster. Instead of reusing an existing discovery URL, each etcd instance shares a new discovery URL to bootstrap the new cluster.
Moreover, discovery URLs should ONLY be used for the initial bootstrapping of a cluster. To change cluster membership after the cluster is already running, see the runtime reconfiguration guide.
Custom etcd discovery service
Discovery uses an existing cluster to bootstrap itself. If using a private etcd cluster, create a URL like so:
By setting the size key to the URL, a discovery URL is created with an expected cluster size of 3.
The URL to use in this case will be https://myetcd.local/v2/keys/discovery/6c007a14875d53d9bf0ef5a6fc0257c817f0fb83 and the etcd members will use the https://myetcd.local/v2/keys/discovery/6c007a14875d53d9bf0ef5a6fc0257c817f0fb83 directory for registration as they start.
Each member must have a different name flag specified. Hostname or machine-id can be a good choice. Or discovery will fail due to duplicated name.
Now we start etcd with those relevant flags for each member:
This will cause each member to register itself with the custom etcd discovery service and begin the cluster once all machines have been registered.
Public etcd discovery service
If no exiting cluster is available, use the public discovery service hosted at discovery.etcd.io. To create a private discovery URL using the “new” endpoint, use the command:
This will create the cluster with an initial size of 3 members. If no size is specified, a default of 3 is used.
Each member must have a different name flag specified or else discovery will fail due to duplicated names. Hostname or machine-id can be a good choice.
Now we start etcd with those relevant flags for each member:
This will cause each member to register itself with the discovery service and begin the cluster once all members have been registered.
Use the environment variable ETCD_DISCOVERY_PROXY to cause etcd to use an HTTP proxy to connect to the discovery service.
Error and warning cases
Discovery server errors
Warnings
This is a harmless warning indicating the discovery URL will be ignored on this machine.
DNS discovery
DNS SRV records
can be used as a discovery mechanism.
The --discovery-srv flag can be used to set the DNS domain name where the discovery SRV records can be found.
Setting --discovery-srv example.com causes DNS SRV records to be looked up in the listed order:
- _etcd-server-ssl._tcp.example.com
- _etcd-server._tcp.example.com
If _etcd-server-ssl._tcp.example.com is found then etcd will attempt the bootstrapping process over TLS.
To help clients discover the etcd cluster, the following DNS SRV records are looked up in the listed order:
- _etcd-client._tcp.example.com
- _etcd-client-ssl._tcp.example.com
If _etcd-client-ssl._tcp.example.com is found, clients will attempt to communicate with the etcd cluster over SSL/TLS.
If etcd is using TLS, the discovery SRV record (e.g. example.com) must be included in the SSL certificate DNS SAN along with the hostname, or clustering will fail with log messages like the following:
If etcd is using TLS without a custom certificate authority, the discovery domain (e.g., example.com) must match the SRV record domain (e.g., infra1.example.com). This is to mitigate attacks that forge SRV records to point to a different domain; the domain would have a valid certificate under PKI but be controlled by an unknown third party.
The -discovery-srv-name flag additionally configures a suffix to the SRV name that is queried during discovery.
Use this flag to differentiate between multiple etcd clusters under the same domain.
For example, if discovery-srv=example.com and -discovery-srv-name=foo are set, the following DNS SRV queries are made:
- _etcd-server-ssl-foo._tcp.example.com
- _etcd-server-foo._tcp.example.com
Create DNS SRV records
Bootstrap the etcd cluster using DNS
etcd cluster members can advertise domain names or IP address, the bootstrap process will resolve DNS A records.
Since 3.2 (3.1 prints warnings) --listen-peer-urls and --listen-client-urls will reject domain name for the network interface binding.
The resolved address in --initial-advertise-peer-urls must match one of the resolved addresses in the SRV targets. The etcd member reads the resolved address to find out if it belongs to the cluster defined in the SRV records.
The cluster can also bootstrap using IP addresses instead of domain names:
Since v3.1.0 (except v3.2.9), when etcd --discovery-srv=example.com is configured with TLS, server will only authenticate peers/clients when the provided certs have root domain example.com as an entry in Subject Alternative Name (SAN) field. See Notes for DNS SRV
.
Gateway
etcd gateway is a simple TCP proxy that forwards network data to the etcd cluster. Please read gateway guide for more information.
Proxy
When the --proxy flag is set, etcd runs in proxy mode
. This proxy mode only supports the etcd v2 API; there are no plans to support the v3 API. Instead, for v3 API support, there will be a new proxy with enhanced features following the etcd 3.0 release.
To setup an etcd cluster with proxies of v2 API, please read the the clustering doc in etcd 2.3 release .
5 - Run etcd clusters as a Kubernetes StatefulSet
Below demonstrates how to perform the static bootstrap process as a Kubernetes StatefulSet.
Example Manifest
This manifest contains a service and statefulset for deploying a static etcd cluster in kubernetes.
If you copy the contents of the manifest into a file named etcd.yaml, it can be applied to a cluster with this command.
Upon being applied, wait for the pods to become ready.
The container used in the example includes etcdctl and can be called directly inside the pods.
To deploy with a self-signed certificate, refer to the commented configuration headings starting with ## TLS to find values that you can uncomment. Additional instructions for generating a cert with cert-manager is included in a section below.
Generating Certificates
In this section, we use Helm to install an operator called cert-manager .
With cert-manager installed in the cluster, self-signed certificates can be generated in the cluster. These generated certificates get placed inside a secret object that can be attached as files in containers.
This is the helm command to install cert-manager.
This is an example ClusterIssuer configuration for generating self-signed certificates.
This manifest creates Certificate objects for the client and server certs, referencing the ClusterIssuer “selfsigned”. The dnsNames should be an exhaustive list of valid hostnames for the certificates that cert-manager creates.
6 - Run etcd clusters inside containers
The following guide shows how to run etcd with Docker using the static bootstrap process .
Docker
In order to expose the etcd API to clients outside of Docker host, use the host IP address of the container. Please see docker inspect
for more detail on how to get the IP address. Alternatively, specify --net=host flag to docker run command to skip placing the container inside of a separate network stack.
Running a single node etcd
Use the host IP address when configuring etcd:
Configure a Docker volume to store etcd data:
Run the latest version of etcd (v3.7.0 at the time of
writing):
List the cluster member:
Running a 3 node etcd cluster
To run etcdctl using API version 3:
Bare Metal
To provision a 3 node etcd cluster on bare-metal, the examples in the baremetal repo may be useful.
Mounting a certificate volume
The etcd release container does not include default root certificates. To use HTTPS with certificates trusted by a root authority (e.g., for discovery), mount a certificate directory into the etcd container:
7 - Failure modes
Failures are common in a large deployment of machines. A machine fails when its hardware or software malfunctions. Multiple machines fail together when there are power failures or network issues. Multiple kinds of failures can also happen at once; it is almost impossible to enumerate all possible failure cases.
In this section, we catalog kinds of failures and discuss how etcd is designed to tolerate these failures. Most users, if not all, can map a particular failure into one kind of failure. To prepare for rare or unrecoverable failures , always back up the etcd cluster.
Minor followers failure
When fewer than half of the followers fail, the etcd cluster can still accept requests and make progress without any major disruption. For example, two follower failures will not affect a five member etcd cluster’s operation. However, clients will lose connectivity to the failed members. Client libraries should hide these interruptions from users for read requests by automatically reconnecting to other members. Operators should expect the system load on the other members to increase due to the reconnections.
Leader failure
When a leader fails, the etcd cluster automatically elects a new leader. The election does not happen instantly once the leader fails. It takes about an election timeout to elect a new leader since the failure detection model is timeout based.
During the leader election the cluster cannot process any writes. Write requests sent during the election are queued for processing until a new leader is elected.
Writes already sent to the old leader but not yet committed may be lost. The new leader has the power to rewrite any uncommitted entries from the previous leader. From the user perspective, some write requests might time out after a new leader election. However, no committed writes are ever lost.
The new leader extends timeouts automatically for all leases. This mechanism ensures a lease will not expire before the granted TTL even if it was granted by the old leader.
Majority failure
When the majority members of the cluster fail, the etcd cluster fails and cannot accept more writes.
The etcd cluster can only recover from a majority failure once the majority of members become available. If a majority of members cannot come back online, then the operator must start disaster recovery to recover the cluster.
Once a majority of members works, the etcd cluster elects a new leader automatically and returns to a healthy state. The new leader extends timeouts automatically for all leases. This mechanism ensures no lease expires due to server side unavailability.
Network partition
A network partition is similar to a minor followers failure or a leader failure. A network partition divides the etcd cluster into two parts; one with a member majority and the other with a member minority. The majority side becomes the available cluster and the minority side is unavailable. There is no “split-brain” in etcd because cluster members are explicitly added/removed with each such change is approved by the current majority of members.
If the leader is on the majority side, then from the majority point of view the failure is a minority follower failure. If the leader is on the minority side, then it is a leader failure. The leader on the minority side steps down and the majority side elects a new leader.
Once the network partition clears, the minority side automatically recognizes the leader from the majority side and recovers its state.
Failure during bootstrapping
A cluster bootstrap is only successful if all required members successfully start. If any failure happens during bootstrapping, remove the data directories on all members and re-bootstrap the cluster with a new cluster-token or new discovery token.
Of course, it is possible to recover a failed bootstrapped cluster like recovering a running cluster. However, it almost always takes more time and resources to recover that cluster than bootstrapping a new one, since there is no data to recover.
8 - Disaster recovery
etcd is designed to withstand machine failures. An etcd cluster automatically recovers from temporary failures (e.g., machine reboots) and tolerates up to (N-1)/2 permanent failures for a cluster of N members. When a member permanently fails, whether due to hardware failure or disk corruption, it loses access to the cluster. If the cluster permanently loses more than (N-1)/2 members then it disastrously fails, irrevocably losing quorum. Once quorum is lost, the cluster cannot reach consensus and therefore cannot continue accepting updates.
To recover from disastrous failure, etcd v3 provides snapshot and restore facilities to recreate the cluster without v3 key data loss. To recover v2 keys, refer to the v2 admin guide .
Snapshotting the keyspace
Recovering a cluster first needs a snapshot of the keyspace from an etcd member. A snapshot may either be taken from a live member with the etcdctl snapshot save command or by copying the member/snap/db file from an etcd data directory. For example, the following command snapshots the keyspace served by $ENDPOINT to the file snapshot.db:
Note that taking the snapshot from the member/snap/db file might lose data that has not been written yet, but is included in the wal (write-ahead-log) folder.
Status of a snapshot
To understand which revision and hash a given snapshot contains, you can use the etcdutl snapshot status command:
Restoring a cluster
Revision Difference
When you are restoring a cluster, existing clients may perceive the revision going back by many hundreds or thousands. This is due to the fact that a given snapshot only contains the data lineage up until the point of when it was taken, whereas the current state might already be further ahead.
This is particularly a problem when running Kubernetes using etcd, where controllers and operators may use so called informers which act as local caches and get notified on updates using watches. Restoring to an older revision may not correctly refresh the caches, causing unpredictable and inconsistent behavior in the controllers.
When restoring from a snapshot in the context of either: known consumers of the watch API, local cached copies of etcd data or when using Kubernetes in general - it is highly recommended to restore using “revision bumps” below.
Restoring from snapshot
To restore a cluster, all that is needed is a single snapshot “db” file. A cluster restore with etcdutl snapshot restore creates new etcd data directories; all members should restore using the same snapshot. Restoring overwrites some snapshot metadata (specifically, the member ID and cluster ID); the member loses its former identity. This metadata overwrite prevents the new member from inadvertently joining an existing cluster. Therefore in order to start a cluster from a snapshot, the restore must start a new logical cluster.
A simple restore can be excuted like this:
Integrity Checks
Snapshot integrity may be optionally verified at restore time. If the snapshot is taken with etcdctl snapshot save, it will have an integrity hash that is checked by etcdutl snapshot restore. If the snapshot is copied from the data directory, there is no integrity hash and it will only restore by using --skip-hash-check.
Restoring with revision bump
In order to ensure the revisions are never decreasing after a restore, you can supply the --bump-revision option. This option takes a 64 bit integer, which denotes how many revisions to add to the current revision of the snapshot. Since each write to etcd increases the revision by one, you may cover a week old snapshot with bumping by 1'000'000'000 assuming that etcd runs with less than 1500 writes per second.
In the context of Kubernetes controllers, it is important to also mark all the revisions, including the bump, as compacted using --mark-compacted. This ensures that all watches are terminated and etcd does not respond to requests about revisions that happened after taking the snapshot - effectively invalidating its informer caches.
A full invocation may look like this:
Restoring with updated membership
The members of an etcd cluster are stored in etcd itself and maintained through the raft consensus algorithm. When quorum is lost entirely, you may want to reconsider where and how the new cluster is formed, for example, on an entirely new set of members.
When restoring from a snapshot, you can directly supply the new membership into the datastore as follows:
This ensures that the newly constructed cluster only connects to the other restored members with the given token and not older members that might still be alive and try to connect.
Alternatively, when starting up etcd, you can supply --force-new-cluster to overwrite cluster membership while keeping existing application data. Note that this is strongly discouraged because it will panic if other members from previous cluster are still alive. Make sure to save snapshots periodically.
End-2-End Example
Grab a snapshot from a live cluster using:
Continuing from the previous example, the following creates new etcd data directories (m1.etcd, m2.etcd, m3.etcd) for a three member cluster:
Next, start etcd with the new data directories:
Now the restored etcd cluster should be available and serving the keyspace from the snapshot.
Starting form etcd v3.6, users can only use etcdctl to take the data to a snapshot, but use etcdutl to restore data from a snapshot. If --data-dir is not specified, the default --data-dir value is <name>.etcd (where <name> is the value from --name). For example, if --data-dir was not provided and the members were named m1, m2, and m3, the --data-dir directories would be m1.etcd, m2.etcd, and m3.etcd.
9 - etcd gateway
What is etcd gateway
etcd gateway is a simple TCP proxy that forwards network data to the etcd cluster. The gateway is stateless and transparent; it neither inspects client requests nor interferes with cluster responses. It does not terminate TLS connections, do TLS handshakes on behalf of its clients, or verify if the connection is secured.
The gateway supports multiple etcd server endpoints and works on a simple round-robin policy. It only routes to available endpoints and hides failures from its clients. Other retry policies, such as weighted round-robin, may be supported in the future.
When to use etcd gateway
Every application that accesses etcd must first have the address of an etcd cluster client endpoint. If multiple applications on the same server access the same etcd cluster, every application still needs to know the advertised client endpoints of the etcd cluster. If the etcd cluster is reconfigured to have different endpoints, every application may also need to update its endpoint list. This wide-scale reconfiguration is both tedious and error prone.
etcd gateway solves this problem by serving as a stable local endpoint. A typical etcd gateway configuration has each machine running a gateway listening on a local address and every etcd application connecting to its local gateway. The upshot is only the gateway needs to update its endpoints instead of updating each and every application.
In summary, to automatically propagate cluster endpoint changes, the etcd gateway runs on every machine serving multiple applications accessing the same etcd cluster.
When not to use etcd gateway
- Improving performance
The gateway is not designed for improving etcd cluster performance. It does not provide caching, watch coalescing or batching. The etcd team is developing a caching proxy designed for improving cluster scalability.
- Running on a cluster management system
Advanced cluster management systems like Kubernetes natively support service discovery. Applications can access an etcd cluster with a DNS name or a virtual IP address managed by the system. For example, kube-proxy is equivalent to etcd gateway.
Start etcd gateway
Consider an etcd cluster with the following static endpoints:
| Name | Address | Hostname | Port |
|---|---|---|---|
| infra0 | 10.0.1.10 | infra0.example.com | 2379 |
| infra1 | 10.0.1.11 | infra1.example.com | 2379 |
| infra2 | 10.0.1.12 | infra2.example.com | 2379 |
Start the etcd gateway to use these static endpoints with the command:
Alternatively, if using DNS for service discovery, consider the DNS SRV entries:
Start the etcd gateway to fetch the endpoints from the DNS SRV entries with the command:
Configuration flags
etcd cluster
–endpoints
- Comma-separated list of etcd server targets for forwarding client connections.
- Default:
127.0.0.1:2379 - Port must be included.
- Invalid example:
https://127.0.0.1:2379(gateway does not terminate TLS). Note that the gateway does not verify the HTTP schema or inspect the requests, it only forwards requests to the given endpoints.
–discovery-srv
- DNS domain used to bootstrap cluster endpoints through SRV records.
- Default: (not set)
Network
–listen-addr
- Interface and port to bind for accepting client requests.
- Default:
127.0.0.1:23790
–retry-delay
- Duration of delay before retrying to connect to failed endpoints.
- Default: 1m0s
- Invalid example: “123” (expects time unit in format)
Security
–insecure-discovery
- Accept SRV records that are insecure or susceptible to man-in-the-middle attacks.
- Default:
false
–trusted-ca-file
- Path to the client TLS CA file for the etcd cluster to verify the endpoints returned from SRV discovery. Note that it is ONLY used for authenticating the discovered endpoints rather than creating connections for data transferring. The gateway never terminates TLS connections or create TLS connections on behalf of its clients.
- Default: (not set)
10 - gRPC proxy
The gRPC proxy is a stateless etcd reverse proxy operating at the gRPC layer (L7). The proxy is designed to reduce the total processing load on the core etcd cluster. For horizontal scalability, it coalesces watch and lease API requests. To protect the cluster against abusive clients, it caches key range requests.
The gRPC proxy supports multiple etcd server endpoints. When the proxy starts, it randomly picks one etcd server endpoint to use. This endpoint serves all requests until the proxy detects an endpoint failure. If the gRPC proxy detects an endpoint failure, it switches to a different endpoint, if available, to hide failures from its clients. Other retry policies, such as weighted round-robin, may be supported in the future.
Scalable watch API
The gRPC proxy coalesces multiple client watchers (c-watchers) on the same key or range into a single watcher (s-watcher) connected to an etcd server. The proxy broadcasts all events from the s-watcher to its c-watchers.
Assuming N clients watch the same key, one gRPC proxy can reduce the watch load on the etcd server from N to 1. Users can deploy multiple gRPC proxies to further distribute server load.
In the following example, three clients watch on key A. The gRPC proxy coalesces the three watchers, creating a single watcher attached to the etcd server.
Limitations
To effectively coalesce multiple client watchers into a single watcher, the gRPC proxy coalesces new c-watchers into an existing s-watcher when possible. This coalesced s-watcher may be out of sync with the etcd server due to network delays or buffered undelivered events. When the watch revision is unspecified, the gRPC proxy will not guarantee the c-watcher will start watching from the most recent store revision. For example, if a client watches from an etcd server with revision 1000, that watcher will begin at revision 1000. If a client watches from the gRPC proxy, may begin watching from revision 990.
Similar limitations apply to cancellation. When the watcher is cancelled, the etcd server’s revision may be greater than the cancellation response revision.
These two limitations should not cause problems for most use cases. In the future, there may be additional options to force the watcher to bypass the gRPC proxy for more accurate revision responses.
Scalable lease API
To keep its leases alive, a client must establish at least one gRPC stream to an etcd server for sending periodic heartbeats. If an etcd workload involves heavy lease activity spread over many clients, these streams may contribute to excessive CPU utilization. To reduce the total number of streams on the core cluster, the proxy supports lease stream coalescing.
Assuming N clients are updating leases, a single gRPC proxy reduces the stream load on the etcd server from N to 1. Deployments may have additional gRPC proxies to further distribute streams across multiple proxies.
In the following example, three clients update three independent leases (L1, L2, and L3). The gRPC proxy coalesces the three client lease streams (c-streams) into a single lease keep alive stream (s-stream) attached to an etcd server. The proxy forwards client-side lease heartbeats from the c-streams to the s-stream, then returns the responses to the corresponding c-streams.
Abusive clients protection
The gRPC proxy caches responses for requests when it does not break consistency requirements. This can protect the etcd server from abusive clients in tight for loops.
Start etcd gRPC proxy
Consider an etcd cluster with the following static endpoints:
| Name | Address | Hostname |
|---|---|---|
| infra0 | 10.0.1.10 | infra0.example.com |
| infra1 | 10.0.1.11 | infra1.example.com |
| infra2 | 10.0.1.12 | infra2.example.com |
Start the etcd gRPC proxy to use these static endpoints with the command:
The etcd gRPC proxy starts and listens on port 2379. It forwards client requests to one of the three endpoints provided above.
Sending requests through the proxy:
Client endpoint synchronization and name resolution
The proxy supports registering its endpoints for discovery by writing to a user-defined endpoint. This serves two purposes. First, it allows clients to synchronize their endpoints against a set of proxy endpoints for high availability. Second, it is an endpoint provider for etcd gRPC naming .
Register proxy(s) by providing a user-defined prefix:
The proxy will list all its members for member list:
This lets clients automatically discover proxy endpoints through Sync:
Note that if a proxy is configured without a resolver prefix,
The member list API to the grpc-proxy returns its own advertise-client-url:
Namespacing
Suppose an application expects full control over the entire key space, but the etcd cluster is shared with other applications. To let all applications run without interfering with each other, the proxy can partition the etcd keyspace so clients appear to have access to the complete keyspace. When the proxy is given the flag --namespace, all client requests going into the proxy are translated to have a user-defined prefix on the keys. Accesses to the etcd cluster will be under the prefix and responses from the proxy will strip away the prefix; to the client, it appears as if there is no prefix at all.
To namespace a proxy, start it with --namespace:
Accesses to the proxy are now transparently prefixed on the etcd cluster:
TLS termination
Terminate TLS from a secure etcd cluster with the gRPC proxy by serving an unencrypted local endpoint.
To try it out, start a single member etcd cluster with client https:
Confirm the client port is serving https:
Next, start a gRPC proxy on localhost:12379 by connecting to the etcd endpoint https://localhost:2379 using the client certificates:
Finally, test the TLS termination by putting a key into the proxy over http:
Metrics and Health
The gRPC proxy exposes /health and Prometheus /metrics endpoints for the etcd members defined by --endpoints. An alternative define an additional URL that will respond to both the /metrics and /health endpoints with the --metrics-addr flag.
Known issue
The main interface of the proxy serves both HTTP2 and HTTP/1.1. If proxy is setup with TLS as show in the above example, when using a client such as cURL against the listening interface will require explicitly setting the protocol to HTTP/1.1 on the request to return /metrics or /health. By using the --metrics-addr flag the secondary interface will not have this requirement.
11 - Hardware recommendations
etcd usually runs well with limited resources for development or testing purposes; it’s common to develop with etcd on a laptop or a cheap cloud machine. However, when running etcd clusters in production, some hardware guidelines are useful for proper administration. These suggestions are not hard rules; they serve as a good starting point for a robust production deployment. As always, deployments should be tested with simulated workloads before running in production.
CPUs
Few etcd deployments require a lot of CPU capacity. Typical clusters need two to four cores to run smoothly. Heavily loaded etcd deployments, serving thousands of clients or tens of thousands of requests per second, tend to be CPU bound since etcd can serve requests from memory. Such heavy deployments usually need eight to sixteen dedicated cores.
Memory
etcd has a relatively small memory footprint but its performance still depends on having enough memory. An etcd server will aggressively cache key-value data and spends most of the rest of its memory tracking watchers. Typically 8GB is enough. For heavy deployments with thousands of watchers and millions of keys, allocate 16GB to 64GB memory accordingly.
Disks
Fast disks are the most critical factor for etcd deployment performance and stability.
A slow disk will increase etcd request latency and potentially hurt cluster stability. Since etcd’s consensus protocol depends on persistently storing metadata to a log, a majority of etcd cluster members must write every request down to disk. Additionally, etcd will also incrementally checkpoint its state to disk so it can truncate this log. If these writes take too long, heartbeats may time out and trigger an election, undermining the stability of the cluster. In general, to tell whether a disk is fast enough for etcd, a benchmarking tool such as fio can be used. Read here for an example.
etcd is very sensitive to disk write latency. Typically 50 sequential IOPS (e.g., a 7200 RPM disk) is required. For heavily loaded clusters, 500 sequential IOPS (e.g., a typical local SSD or a high performance virtualized block device) is recommended. Note that most cloud providers publish concurrent IOPS rather than sequential IOPS; the published concurrent IOPS can be 10x greater than the sequential IOPS. To measure actual sequential IOPS, we suggest using a disk benchmarking tool such as diskbench or fio .
etcd requires only modest disk bandwidth but more disk bandwidth buys faster recovery times when a failed member has to catch up with the cluster. Typically 10MB/s will recover 100MB data within 15 seconds. For large clusters, 100MB/s or higher is suggested for recovering 1GB data within 15 seconds.
When possible, back etcd’s storage with a SSD. A SSD usually provides lower write latencies and with less variance than a spinning disk, thus improving the stability and reliability of etcd. If using spinning disk, get the fastest disks possible (15,000 RPM). Using RAID 0 is also an effective way to increase disk speed, for both spinning disks and SSD. With at least three cluster members, mirroring and/or parity variants of RAID are unnecessary; etcd’s consistent replication already gets high availability.
Network
Multi-member etcd deployments benefit from a fast and reliable network. In order for etcd to be both consistent and partition tolerant, an unreliable network with partitioning outages will lead to poor availability. Low latency ensures etcd members can communicate fast. High bandwidth can reduce the time to recover a failed etcd member. 1GbE is sufficient for common etcd deployments. For large etcd clusters, a 10GbE network will reduce mean time to recovery.
Deploy etcd members within a single data center when possible to avoid latency overheads and lessen the possibility of partitioning events. If a failure domain in another data center is required, choose a data center closer to the existing one. Please also read the tuning documentation for more information on cross data center deployment.
Example hardware configurations
Here are a few example hardware setups on AWS and GCE environments. As mentioned before, but must be stressed regardless, administrators should test an etcd deployment with a simulated workload before putting it into production.
Note that these configurations assume these machines are totally dedicated to etcd. Running other applications along with etcd on these machines may cause resource contentions and lead to cluster instability.
Small cluster
A small cluster serves fewer than 100 clients, fewer than 200 of requests per second, and stores no more than 100MB of data.
Example application workload: A 50-node Kubernetes cluster
| Provider | Type | vCPUs | Memory (GB) | Max concurrent IOPS | Disk bandwidth (MB/s) |
|---|---|---|---|---|---|
| AWS | m4.large | 2 | 8 | 3600 | 56.25 |
| GCE | n1-standard-2 + 50GB PD SSD | 2 | 7.5 | 1500 | 25 |
Medium cluster
A medium cluster serves fewer than 500 clients, fewer than 1,000 of requests per second, and stores no more than 500MB of data.
Example application workload: A 250-node Kubernetes cluster
| Provider | Type | vCPUs | Memory (GB) | Max concurrent IOPS | Disk bandwidth (MB/s) |
|---|---|---|---|---|---|
| AWS | m4.xlarge | 4 | 16 | 6000 | 93.75 |
| GCE | n1-standard-4 + 150GB PD SSD | 4 | 15 | 4500 | 75 |
Large cluster
A large cluster serves fewer than 1,500 clients, fewer than 10,000 of requests per second, and stores no more than 1GB of data.
Example application workload: A 1,000-node Kubernetes cluster
| Provider | Type | vCPUs | Memory (GB) | Max concurrent IOPS | Disk bandwidth (MB/s) |
|---|---|---|---|---|---|
| AWS | m4.2xlarge | 8 | 32 | 8000 | 125 |
| GCE | n1-standard-8 + 250GB PD SSD | 8 | 30 | 7500 | 125 |
xLarge cluster
An xLarge cluster serves more than 1,500 clients, more than 10,000 of requests per second, and stores more than 1GB data.
Example application workload: A 3,000 node Kubernetes cluster
| Provider | Type | vCPUs | Memory (GB) | Max concurrent IOPS | Disk bandwidth (MB/s) |
|---|---|---|---|---|---|
| AWS | m4.4xlarge | 16 | 64 | 16,000 | 250 |
| GCE | n1-standard-16 + 500GB PD SSD | 16 | 60 | 15,000 | 250 |
12 - Maintenance
Overview
An etcd cluster needs periodic maintenance to remain reliable. Depending on an etcd application’s needs, this maintenance can usually be automated and performed without downtime or significantly degraded performance.
All etcd maintenance manages storage resources consumed by the etcd keyspace. Failure to adequately control the keyspace size is guarded by storage space quotas; if an etcd member runs low on space, a quota will trigger cluster-wide alarms which will put the system into a limited-operation maintenance mode. To avoid running out of space for writes to the keyspace, the etcd keyspace history must be compacted. Storage space itself may be reclaimed by defragmenting etcd members. Finally, periodic snapshot backups of etcd member state makes it possible to recover any unintended logical data loss or corruption caused by operational error.
Raft log retention
etcd --snapshot-count configures the number of applied Raft entries to hold in-memory before compaction. When --snapshot-count reaches, server first persists snapshot data onto disk, and then truncates old entries. When a slow follower requests logs before a compacted index, leader sends the snapshot forcing the follower to overwrite its state.
Higher --snapshot-count holds more Raft entries in memory until snapshot, thus causing recurrent higher memory usage
. Since leader retains latest Raft entries for longer, a slow follower has more time to catch up before leader snapshot. --snapshot-count is a tradeoff between higher memory usage and better availabilities of slow followers.
Since v3.2, the default value of --snapshot-count has changed from from 10,000 to 100,000
.
In performance-wise, --snapshot-count greater than 100,000 may impact the write throughput. Higher number of in-memory objects can slow down Go GC mark phase runtime.scanobject
, and infrequent memory reclamation makes allocation slow. Performance varies depending on the workloads and system environments. However, in general, too frequent compaction affects cluster availabilities and write throughputs. Too infrequent compaction is also harmful placing too much pressure on Go garbage collector. See Understanding Performance Aspects of etcd and Raft
for more research results.
History compaction: v3 API Key-Value Database
Since etcd keeps an exact history of its keyspace, this history should be periodically compacted to avoid performance degradation and eventual storage space exhaustion. Compacting the keyspace history drops all information about keys superseded prior to a given keyspace revision. The space used by these keys then becomes available for additional writes to the keyspace.
The keyspace can be compacted automatically with etcd’s time windowed history retention policy, or manually with etcdctl. The etcdctl method provides fine-grained control over the compacting process whereas automatic compacting fits applications that only need key history for some length of time.
An etcdctl initiated compaction works as follows:
Revisions prior to the compaction revision become inaccessible:
Auto Compaction
etcd can be set to automatically compact the keyspace with the --auto-compaction-mode and --auto-compaction-retention options. There are two compaction modes: periodic (default) and revision.
Periodic compaction
Periodic compaction retains a time-based window of keyspace history:
The retention value specifies how much history to keep. A record will not be compacted until approximately that duration after it was created. This ensures that slow watchers can still catch up within the retention window.
When the retention period is greater than 1 hour, etcd compacts every hour while maintaining the full retention window. When the retention period is 1 hour or less, etcd compacts at the retention period interval.
For example, with --auto-compaction-retention=10h, etcd waits 10 hours for the first compaction, then compacts every hour afterwards:
Recommended values depend on the use case:
- Frequent updates to the same keys: a short period such as
1hor30m - Infrequent updates: a longer period such as
24h,48h, or72h - General-purpose default:
10h
Revision compaction
Revision compaction retains a fixed number of revisions:
etcd checks every 5 minutes and compacts on "latest revision" - 1000. For example, when the latest revision is 30000, it compacts on revision 29000.
Defragmentation
After compacting the keyspace, the backend database may exhibit internal fragmentation. Any internal fragmentation is space that is free to use by the backend but still consumes storage space. Compacting old revisions internally fragments etcd by leaving gaps in backend database. Fragmented space is available for use by etcd but unavailable to the host filesystem. In other words, deleting application data does not reclaim the space on disk.
The process of defragmentation releases this storage space back to the file system. Defragmentation is issued on a per-member basis so that cluster-wide latency spikes may be avoided.
To defragment an etcd member, use the etcdctl defrag command:
Note that defragmentation to a live member blocks the system from reading and writing data while rebuilding its states
Note that defragmentation request does not get replicated over cluster. That is, the request is only applied to the local node. Specify all members in --endpoints flag or --cluster flag to automatically find all cluster members.
Run defragment operations for all endpoints in the cluster associated with the default endpoint:
To defragment an etcd data directory directly, while etcd is not running, use the command:
Space quota
The space quota in etcd ensures the cluster operates in a reliable fashion. Without a space quota, etcd may suffer from poor performance if the keyspace grows excessively large, or it may simply run out of storage space, leading to unpredictable cluster behavior. If the keyspace’s backend database for any member exceeds the space quota, etcd raises a cluster-wide alarm that puts the cluster into a maintenance mode which only accepts key reads and deletes. Only after freeing enough space in the keyspace and defragmenting the backend database, along with clearing the space quota alarm can the cluster resume normal operation.
By default, etcd sets a conservative space quota suitable for most applications, but it may be configured on the command line, in bytes:
The space quota can be triggered with a loop:
Removing excessive keyspace data and defragmenting the backend database will put the cluster back within the quota limits:
The metric etcd_mvcc_db_total_size_in_use_in_bytes indicates the actual database usage after a history compaction, while etcd_debugging_mvcc_db_total_size_in_bytes shows the database size including free space waiting for defragmentation. The latter increases only when the former is close to it, meaning when both of these metrics are close to the quota, a history compaction is required to avoid triggering the space quota.
etcd_debugging_mvcc_db_total_size_in_bytes is renamed to etcd_mvcc_db_total_size_in_bytes from v3.4.
It is possible to get an ErrGRPCNoSpace error for a Put/Txn/LeaseGrant request, and still have the write request succeed in the backend, because etcd checks space quota at the API layer and the internal Apply layer, and the Apply layer will only raise the NOSPACE alarm without blocking the transaction from proceeding.
Snapshot backup
Snapshotting the etcd cluster on a regular basis serves as a durable backup for an etcd keyspace. By taking periodic snapshots of an etcd member’s backend database, an etcd cluster can be recovered to a point in time with a known good state.
A snapshot is taken with etcdctl:
13 - Monitoring etcd
Each etcd server provides local monitoring information on its client port through http endpoints. The monitoring data is useful for both system health checking and cluster debugging.
Debug endpoint
If --log-level=debug is set, the etcd server exports debugging information on its client port under the /debug path. Take care when setting --log-level=debug, since there will be degraded performance and verbose logging.
The /debug/pprof endpoint is the standard go runtime profiling endpoint. This can be used to profile CPU, heap, mutex, and goroutine utilization. For example, here go tool pprof gets the top 10 functions where etcd spends its time:
The /debug/requests endpoint gives gRPC traces and performance statistics through a web browser. For example, here is a Range request for the key abc:
Metrics endpoint
Each etcd server exports metrics under the /metrics path on its client port and optionally on locations given by --listen-metrics-urls.
The metrics can be fetched with curl:
Health Check
Since v3.3.0, in addition to responding to the /metrics endpoint, any locations specified by --listen-metrics-urls will also respond to the /health endpoint. This can be useful if the standard endpoint is configured with mutual (client) TLS authentication, but a load balancer or monitoring service still needs access to the health check.
Since v3.4, two new endpoints /livez and /readyz are added.
- the
/livezendpoint reflects whether the process is alive or if it needs a restart. - the
/readyzendpoint reflects whether the process is ready to serve traffic.
Design details of the endpoints are documented in the KEP .
Each endpoint includes several individual health checks, and you can use the verbose parameter to print out the details of the checks and their status, for example
and you would see the response similar to
The http API also supports to exclude specific checks, for example
Prometheus
Running a Prometheus monitoring service is the easiest way to ingest and record etcd’s metrics.
First, install Prometheus:
Set Prometheus’s scraper to target the etcd cluster endpoints:
Set up the Prometheus handler:
Now Prometheus will scrape etcd metrics every 10 seconds.
Alerting
There is a set of default alerts for etcd v3 clusters for Prometheus.
Note that job labels may need to be adjusted to fit a particular need. The rules were written to apply to a single cluster so it is recommended to choose labels unique to a cluster.
Grafana
Grafana has built-in Prometheus support; just add a Prometheus data source:
Then import the default etcd dashboard template
and customize. For instance, if Prometheus data source name is my-etcd, the datasource field values in JSON also need to be my-etcd.
Sample dashboard:
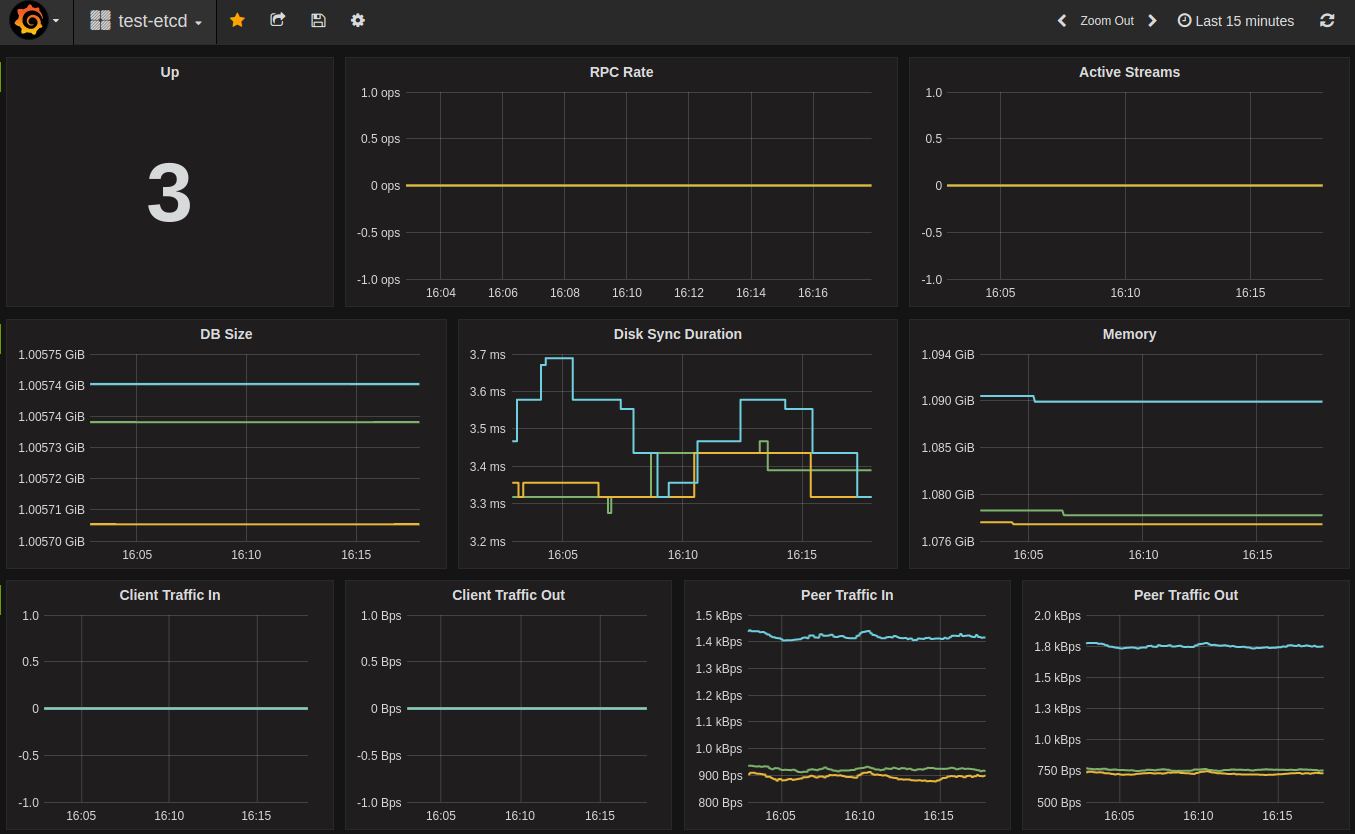
Distributed tracing
In v3.5 etcd has added support for distributed tracing using OpenTelemetry .
This feature is still experimental and can change at any time.
To enable this experimental feature, pass the --experimental-enable-distributed-tracing=true to the etcd server, along with the --experimental-distributed-tracing-sampling-rate=<number> flag to choose how many samples to collect per million spans, the default sampling rate is 0.
Configure the distributed tracing by starting etcd server with the following optional flags:
--experimental-distributed-tracing-address- (Optional) - “localhost:4317” - Address of the tracing collector.--experimental-distributed-tracing-service-name- (Optional) - “etcd” - Distributed tracing service name, must be same across all etcd instances.--experimental-distributed-tracing-instance-id- (Optional) - Instance ID, while optional it’s strongly recommended to set, must be unique per etcd instance.
Before enabling the distributed tracing, make sure to have the OpenTelemetry endpoint, if that address differs to the default one, override with the --experimental-distributed-tracing-address flag. Due to OpenTelemetry having different ways of running, refer to the collector documentation
to learn more.
There is a resource overhead, as with any observability signal, according to our initial measurements that overhead could be between 2% - 4% CPU overhead.
14 - Performance
Understanding performance
etcd provides stable, sustained high performance. Two factors define performance: latency and throughput. Latency is the time taken to complete an operation. Throughput is the total operations completed within some time period. Usually average latency increases as the overall throughput increases when etcd accepts concurrent client requests. In common cloud environments, like a standard n-4 on Google Compute Engine (GCE) or a comparable machine type on AWS, a three member etcd cluster finishes a request in less than one millisecond under light load, and can complete more than 30,000 requests per second under heavy load.
etcd uses the Raft consensus algorithm to replicate requests among members and reach agreement. Consensus performance, especially commit latency, is limited by two physical constraints: network IO latency and disk IO latency. The minimum time to finish an etcd request is the network Round Trip Time (RTT) between members, plus the time fdatasync requires to commit the data to permanent storage. The RTT within a datacenter may be as long as several hundred microseconds. A typical RTT within the United States is around 50ms, and can be as slow as 400ms between continents. The typical fdatasync latency for a spinning disk is about 10ms. For SSDs, the latency is often lower than 1ms. To increase throughput, etcd batches multiple requests together and submits them to Raft. This batching policy lets etcd attain high throughput despite heavy load.
There are other sub-systems which impact the overall performance of etcd. Each serialized etcd request must run through etcd’s boltdb-backed MVCC storage engine, which usually takes tens of microseconds to finish. Periodically etcd incrementally snapshots its recently applied requests, merging them back with the previous on-disk snapshot. This process may lead to a latency spike. Although this is usually not a problem on SSDs, it may double the observed latency on HDD. Likewise, inflight compactions can impact etcd’s performance. Fortunately, the impact is often insignificant since the compaction is staggered so it does not compete for resources with regular requests. The RPC system, gRPC, gives etcd a well-defined, extensible API, but it also introduces additional latency, especially for local reads.
Benchmarks
Benchmarking etcd performance can be done with the benchmark CLI tool included with etcd.
For some baseline performance numbers, we consider a three member etcd cluster with the following hardware configuration:
- Google Cloud Compute Engine
- 3 machines of 8 vCPUs + 16GB Memory + 50GB SSD
- 1 machine(client) of 16 vCPUs + 30GB Memory + 50GB SSD
- Ubuntu 17.04
- etcd 3.2.0, go 1.8.3
With this configuration, etcd can approximately write:
| Number of keys | Key size in bytes | Value size in bytes | Number of connections | Number of clients | Target etcd server | Average write QPS | Average latency per request | Average server RSS |
|---|---|---|---|---|---|---|---|---|
| 10,000 | 8 | 256 | 1 | 1 | leader only | 583 | 1.6ms | 48 MB |
| 100,000 | 8 | 256 | 100 | 1000 | leader only | 44,341 | 22ms | 124MB |
| 100,000 | 8 | 256 | 100 | 1000 | all members | 50,104 | 20ms | 126MB |
Sample commands are:
Linearizable read requests go through a quorum of cluster members for consensus to fetch the most recent data. Serializable read requests are cheaper than linearizable reads since they are served by any single etcd member, instead of a quorum of members, in exchange for possibly serving stale data. etcd can read:
| Number of requests | Key size in bytes | Value size in bytes | Number of connections | Number of clients | Consistency | Average read QPS | Average latency per request |
|---|---|---|---|---|---|---|---|
| 10,000 | 8 | 256 | 1 | 1 | Linearizable | 1,353 | 0.7ms |
| 10,000 | 8 | 256 | 1 | 1 | Serializable | 2,909 | 0.3ms |
| 100,000 | 8 | 256 | 100 | 1000 | Linearizable | 141,578 | 5.5ms |
| 100,000 | 8 | 256 | 100 | 1000 | Serializable | 185,758 | 2.2ms |
Sample commands are:
We encourage running the benchmark test when setting up an etcd cluster for the first time in a new environment to ensure the cluster achieves adequate performance; cluster latency and throughput can be sensitive to minor environment differences.
15 - Design of runtime reconfiguration
Runtime reconfiguration is one of the hardest and most error prone features in a distributed system, especially in a consensus based system like etcd.
Read on to learn about the design of etcd’s runtime reconfiguration commands and how we tackled these problems.
Two phase config changes keep the cluster safe
In etcd, every runtime reconfiguration has to go through two phases for safety reasons. For example, to add a member, first inform the cluster of the new configuration and then start the new member.
Phase 1 - Inform cluster of new configuration
To add a member into an etcd cluster, make an API call to request a new member to be added to the cluster. This is the only way to add a new member into an existing cluster. The API call returns when the cluster agrees on the configuration change.
Phase 2 - Start new member
To join the new etcd member into the existing cluster, specify the correct initial-cluster and set initial-cluster-state to existing. When the member starts, it will contact the existing cluster first and verify the current cluster configuration matches the expected one specified in initial-cluster. When the new member successfully starts, the cluster has reached the expected configuration.
By splitting the process into two discrete phases users are forced to be explicit regarding cluster membership changes. This actually gives users more flexibility and makes things easier to reason about. For example, if there is an attempt to add a new member with the same ID as an existing member in an etcd cluster, the action will fail immediately during phase one without impacting the running cluster. Similar protection is provided to prevent adding new members by mistake. If a new etcd member attempts to join the cluster before the cluster has accepted the configuration change, it will not be accepted by the cluster.
Without the explicit workflow around cluster membership etcd would be vulnerable to unexpected cluster membership changes. For example, if etcd is running under an init system such as systemd, etcd would be restarted after being removed via the membership API, and attempt to rejoin the cluster on startup. This cycle would continue every time a member is removed via the API and systemd is set to restart etcd after failing, which is unexpected.
We expect runtime reconfiguration to be an infrequent operation. We decided to keep it explicit and user-driven to ensure configuration safety and keep the cluster always running smoothly under explicit control.
Permanent loss of quorum requires new cluster
If a cluster permanently loses a majority of its members, a new cluster will need to be started from an old data directory to recover the previous state.
It is entirely possible to force removing the failed members from the existing cluster to recover. However, we decided not to support this method since it bypasses the normal consensus committing phase, which is unsafe. If the member to remove is not actually dead or force removed through different members in the same cluster, etcd will end up with a diverged cluster with same clusterID. This is very dangerous and hard to debug/fix afterwards.
With a correct deployment, the possibility of permanent majority loss is very low. But it is a severe enough problem that is worth special care. We strongly suggest reading the disaster recovery documentation and preparing for permanent majority loss before putting etcd into production.
Do not use public discovery service for runtime reconfiguration
The public discovery service should only be used for bootstrapping a cluster. To join member into an existing cluster, use the runtime reconfiguration API.
The discovery service is designed for bootstrapping an etcd cluster in a cloud environment, when the IP addresses of all the members are not known beforehand. After successfully bootstrapping a cluster, the IP addresses of all the members are known. Technically, the discovery service should no longer be needed.
It seems that using public discovery service is a convenient way to do runtime reconfiguration, after all discovery service already has all the cluster configuration information. However relying on public discovery service brings troubles:
it introduces external dependencies for the entire life-cycle of the cluster, not just bootstrap time. If there is a network issue between the cluster and public discovery service, the cluster will suffer from it.
public discovery service must reflect correct runtime configuration of the cluster during its life-cycle. It has to provide security mechanisms to avoid bad actions, and it is hard.
public discovery service has to keep tens of thousands of cluster configurations. Our public discovery service backend is not ready for that workload.
To have a discovery service that supports runtime reconfiguration, the best choice is to build a private one.
16 - Runtime reconfiguration
etcd comes with support for incremental runtime reconfiguration, which allows users to update the membership of the cluster at run time.
Reconfiguration requests can only be processed when a majority of cluster members are functioning. It is highly recommended to always have a cluster size greater than two in production. It is unsafe to remove a member from a two member cluster. The majority of a two member cluster is also two. If there is a failure during the removal process, the cluster might not be able to make progress and need to restart from majority failure .
To better understand the design behind runtime reconfiguration, please read the runtime reconfiguration document .
Reconfiguration use cases
This section will walk through some common reasons for reconfiguring a cluster. Most of these reasons just involve combinations of adding or removing a member, which are explained below under Cluster Reconfiguration Operations .
Cycle or upgrade multiple machines
If multiple cluster members need to move due to planned maintenance (hardware upgrades, network downtime, etc.), it is recommended to modify members one at a time.
It is safe to remove the leader, however there is a brief period of downtime while the election process takes place. If the cluster holds more than 50MB of v2 data, it is recommended to migrate the member’s data directory .
Change the cluster size
Increasing the cluster size can enhance failure tolerance and provide better read performance. Since clients can read from any member, increasing the number of members increases the overall serialized read throughput.
Decreasing the cluster size can improve the write performance of a cluster, with a trade-off of decreased resilience. Writes into the cluster are replicated to a majority of members of the cluster before considered committed. Decreasing the cluster size lowers the majority, and each write is committed more quickly.
Replace a failed machine
If a machine fails due to hardware failure, data directory corruption, or some other fatal situation, it should be replaced as soon as possible. Machines that have failed but haven’t been removed adversely affect the quorum and reduce the tolerance for an additional failure.
To replace the machine, follow the instructions for removing the member from the cluster, and then add a new member in its place. If the cluster holds more than 50MB, it is recommended to migrate the failed member’s data directory if it is still accessible.
Restart cluster from majority failure
If the majority of the cluster is lost or all of the nodes have changed IP addresses, then manual action is necessary to recover safely. The basic steps in the recovery process include creating a new cluster using the old data , forcing a single member to act as the leader, and finally using runtime configuration to add new members to this new cluster one at a time.
Recover cluster from minority failure
If a specific member is lost, then it is equivalent to replacing a failed machine. The steps are mentioned in Replace a failed machine .
Cluster reconfiguration operations
With these use cases in mind, the involved operations can be described for each.
Before making any change, a simple majority (quorum) of etcd members must be available. This is essentially the same requirement for any kind of write to etcd.
All changes to the cluster must be done sequentially:
- To update a single member peerURLs, issue an update operation
- To replace a healthy single member, remove the old member then add a new member
- To increase from 3 to 5 members, issue two add operations
- To decrease from 5 to 3, issue two remove operations
All of these examples use the etcdctl command line tool that ships with etcd. To change membership without etcdctl, use the v2 HTTP members API
or the v3 gRPC members API
.
Update a member
Update advertise client URLs
To update the advertise client URLs of a member, simply restart that member with updated client urls flag (--advertise-client-urls) or environment variable (ETCD_ADVERTISE_CLIENT_URLS). The restarted member will self publish the updated URLs. A wrongly updated client URL will not affect the health of the etcd cluster.
Update advertise peer URLs
To update the advertise peer URLs of a member, first update it explicitly via member command and then restart the member. The additional action is required since updating peer URLs changes the cluster wide configuration and can affect the health of the etcd cluster.
To update the advertise peer URLs, first find the target member’s ID. To list all members with etcdctl:
This example will update a8266ecf031671f3 member ID and change its peerURLs value to http://10.0.1.10:2380:
Remove a member
Suppose the member ID to remove is a8266ecf031671f3. Use the remove command to perform the removal:
The target member will stop itself at this point and print out the removal in the log:
It is safe to remove the leader, however the cluster will be inactive while a new leader is elected. This duration is normally the period of election timeout plus the voting process.
Add a new member
Adding a member is a two step process:
- Add the new member to the cluster via the HTTP members API
, the gRPC members API
, or the
etcdctl member addcommand. - Start the new member with the new cluster configuration, including a list of the updated members (existing members + the new member).
etcdctl adds a new member to the cluster by specifying the member’s name
and advertised peer URLs
:
etcdctl has informed the cluster about the new member and printed out the environment variables needed to successfully start it. Now start the new etcd process with the relevant flags for the new member:
The new member will run as a part of the cluster and immediately begin catching up with the rest of the cluster.
If adding multiple members the best practice is to configure a single member at a time and verify it starts correctly before adding more new members. If adding a new member to a 1-node cluster, the cluster cannot make progress before the new member starts because it needs two members as majority to agree on the consensus. This behavior only happens between the time etcdctl member add informs the cluster about the new member and the new member successfully establishing a connection to the existing one.
Add a new member as learner
Starting from v3.4, etcd supports adding a new member as learner / non-voting member. The motivation and design can be found in design doc . In order to make the process of adding a new member safer, and to reduce cluster downtime when the new member is added, it is recommended that the new member is added to cluster as a learner until it catches up. This can be described as a three step process:
Add the new member as learner via gRPC members API or the
etcdctl member add --learnercommand.Start the new member with the new cluster configuration, including a list of the updated members (existing members + the new member). This step is exactly the same as before.
Promote the newly added learner to voting member via gRPC members API or the
etcdctl member promotecommand. etcd server validates promote request to ensure its operational safety. Only after its raft log has caught up to leader’s can learner be promoted to a voting member. If a learner member has not caught up to leader’s raft log, member promote request will fail (see error cases when promoting a member section for more details). In this case, user should wait and retry later.
In v3.4, etcd server limits the number of learners that cluster can have to one. The main consideration is to limit the extra workload on leader due to propagating data from leader to learner.
Use etcdctl member add with flag --learner to add new member to cluster as learner.
After new etcd process is started for the newly added learner member, use etcdctl member promote to promote learner to voting member.
Error cases when adding members
In the following case a new host is not included in the list of enumerated nodes. If this is a new cluster, the node must be added to the list of initial cluster members.
In this case, give a different address (10.0.1.14:2380) from the one used to join the cluster (10.0.1.13:2380):
If etcd starts using the data directory of a removed member, etcd automatically exits if it connects to any active member in the cluster:
Error cases when adding a learner member
Cannot add learner to cluster if the cluster already has 1 learner (v3.4).
Error cases when promoting a learner member
Learner can only be promoted to voting member if it is in sync with leader.
Promoting a member that is not a learner will fail.
Promoting a member that does not exist in cluster will fail.
Strict reconfiguration check mode (-strict-reconfig-check)
As described in the above, the best practice of adding new members is to configure a single member at a time and verify it starts correctly before adding more new members. This step by step approach is very important because if newly added members is not configured correctly (for example the peer URLs are incorrect), the cluster can lose quorum. The quorum loss happens since the newly added member are counted in the quorum even if that member is not reachable from other existing members. Also quorum loss might happen if there is a connectivity issue or there are operational issues.
For avoiding this problem, etcd provides an option -strict-reconfig-check. If this option is passed to etcd, etcd rejects reconfiguration requests if the number of started members will be less than a quorum of the reconfigured cluster.
It is enabled by default.
17 - Supported platforms
Support tiers
etcd runs on different platforms, but the guarantees it provides depends on a platform’s support tier:
- Tier 1: fully supported by etcd maintainers ; etcd is guaranteed to pass all tests including functional and robustness tests.
- Tier 2: etcd is guaranteed to pass integration and end-to-end tests but not necessarily functional or robustness tests.
- Tier 3: etcd is guaranteed to build, may be lightly tested (or not), and so it should be considered unstable.
Current support
The following table lists currently supported platforms and their corresponding etcd support tier:
| Architecture | Operating system | Support tier | Maintainers |
|---|---|---|---|
| AMD64 | Linux | 1 | etcd maintainers |
| ARM64 | Linux | 1 | etcd maintainers |
| AMD64 | Darwin | 3 | |
| ARM64 | Darwin | 3 | |
| AMD64 | Windows | 3 | |
| ppc64le | Linux | 3 | |
| s390x | Linux | 3 |
Unlisted platforms are unsupported.
Supporting a new platform
Want to contribute to etcd as the “official” maintainer of a new platform? In addition to committing to support the platform, you must setup etcd continuous integration (CI) satisfying the following requirements, depending on the support tier:
| etcd continuous integration | Tier 1 | Tier 2 | Tier 3 |
|---|---|---|---|
| Build passes | ✓ | ✓ | ✓ |
| Unit tests pass | ✓ | ✓ | |
| Integration and end-to-end tests pass | ✓ | ✓ | |
| Robustness tests pass | ✓ |
For an example of setting up tier-2 CI for ARM64, see etcd PR #12928 .
Unsupported platforms
To avoid inadvertently running an etcd server on an unsupported platform, etcd
prints a warning message and exits immediately unless the environment variable
ETCD_UNSUPPORTED_ARCH is set to the target architecture.
32-bit systems etcd has known issues on 32-bit systems due to a bug in the Go runtime. For more information see the Go issue #599 and the atomic package bug note .
18 - Versioning
This document describes the versions supported by the etcd project.
Service versioning and supported versions
etcd versions are expressed as x.y.z, where x is the major version, y is the minor version, and z is the patch version, following Semantic Versioning terminology. New minor versions may add additional features to the API.
The etcd project maintains release branches for the current version and previous release. For example, when v3.5 is the current version, v3.4 is supported. When v3.6 is released, v3.4 goes out of support.
Applicable fixes, including security fixes, may be backported to those two release branches, depending on severity and feasibility. Patch releases are cut from those branches when required.
The project Maintainers own this decision.
You can check the running etcd cluster version with etcdctl:
API versioning
The v3 API responses should not change after the 3.0.0 release but new features will be added over time.
19 - Data Corruption
etcd has built in automated data corruption detection to prevent member state from diverging.
Enabling data corruption detection
Data corruption detection can be done using:
- Initial check, enabled with
--experimental-initial-corrupt-checkflag. - Periodic check of:
- Compacted revision hash, enabled with
--experimental-compact-hash-check-enabledflag. - Latest revision hash, enabled with
--experimental-corrupt-check-timeflag.
- Compacted revision hash, enabled with
Initial check will be executed during bootstrap of etcd member. Member will compare its persistent state vs other members and exit if there is a mismatch.
Both periodic check will be executed by the cluster leader in a cluster that is already running. Leader will compare its persistent state vs other members and raise a CORRUPT ALARM if there is a mismatch. Both checks serve the same purpose, however they are both worth enabling to balance performance and time to detection.
- Compacted revision hash check - requires regular compaction, minimal performance cost, handles slow followers.
- Latest revision hash check - high performance cost, doesn’t handle slow followers or frequent compactions.
Compacted revision hash check
When enabled using --experimental-compact-hash-check-enabled flag, check will be executed once every minute.
This can be adjusted using --experimental-compact-hash-check-time flag using format: 1m - every minute, 1h - evey hour.
This check extends compaction to also calculate checksum that can be compared between cluster members.
Doesn’t cause additional database scan making it very cheap, but requiring a regular compaction in cluster.
Latest revision hash check
Enabled using --experimental-corrupt-check-time flag, requires providing an execution period in format: 1m - every minute, 1h - evey hour.
Recommended period is a couple of hours due to a high performance cost.
Running a check requires computing a checksum by scanning entire etcd content at given revision.
Restoring a corrupted member
There are three ways to restore a corrupted member:
- Purge member persistent state
- Replace member
- Restore whole cluster
After the corrupted member is restored, CORRUPT ALARM can be removed.
Purge member persistent state
Members state can be purged by:
- Stopping the etcd instance.
- Backing up etcd data directory.
- Moving out the
snapsubdirectory from the etcd data directory. - Starting
etcdwith--initial-cluster-state=existingand cluster members listed in--initial-cluster.
Etcd member is expected to download up-to-date snapshot from the leader.
Replace member
Member can be replaced by:
- Stopping the etcd instance.
- Backing up the etcd data directory.
- Removing the data directory.
- Removing the member from cluster by running
etcdctl member remove. - Adding it back by running
etcdctl member add - Starting
etcdwith--initial-cluster-state=existingand cluster members listed in--initial-cluster.
Restore whole cluster
Cluster can be restored by saving a snapshot from current leader and restoring it to all members.
Run etcdctl snapshot save against the leader and follow restoring a cluster procedure
.